

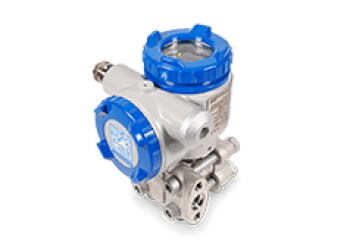
Absolute pressure transmitter - FKA
ref : FKAFrom
1557,00 € Request a quoteAbsolute pressure transmitters are commonly used in industry to measure the total pressure exerted by a fluid (gas or liquid) in relation to a perfect vacuum. However, over time, these transmitters can lose their accuracy, leading to inaccurate measurements and affecting the quality of the final product. To avoid such problems, it is important to calibrate these pressure transmitters regularly.

Understanding pressure transmitter calibration is essential to ensure accurate pressure readings.
Calibration is the process of comparing the transmitter output with a known reference value. This enables any pressure errors to be identified and corrected, and accurate measurements to be obtained.
Calibration also helps to extend the transmitter's life and avoid production losses or scrap.
The calibration procedure for absolute pressure transmitters involves several stages, including preparation of the equipment, setting up the calibration system and the calibration itself. It is essential to follow the manufacturer's instructions and use the appropriate equipment to ensure accurate results. With proper calibration, vacuum pressure transducers can provide reliable, accurate measurements for many years.
In this blog post, we'll discuss how to calibrate your absolute pressure transducers to ensure optimum performance and accuracy.

Key Takeaways

Before going into the details of the calibration process, it's important to first understand why pressure is measured and the definition of a pressure transmitter.
The pressure transmitter is an essential component in many industrial applications for measuring pressures (in bar or other pressure units) and converting them into electrical signals (mA).
An absolute pressure transmitter refers specifically to a type of pressure transmitter that measures absolute pressure as opposed to gauge pressure or differential pressure.
For any type of pressure sensor, regular calibration is crucial to ensure that output signals remain accurate and consistent. A thorough understanding of the pressure transmitter calibration process is a must for instrumentation professionals.

Before proceeding with calibration, gather together the tools and equipment required for this procedure.
These generally include :

Consider a pressure transmitter absolute FKA to be calibrated with a scale of 0-760 torr.
First, carefully isolate the pressure transmitter absolute from the process fluid by closing the isolation valve or manifold.
Next, open the bleed valve or loosen the bleed valve to release any pressure in the sensor flanges.
This is crucial to ensure safe and accurate calibration.

Supply the pressure transmitter with 24Vdc power using the cables.
Now connect the pressure generator to the NPT pressure port of the absolute pressure transmitter.
Check that the connection is tight and leak-free.
Next, connect the sensor's 4-20 mA output to the HART pocket.
Establish the connection with the sensor, allowing you to configure the parameters and adjust the output.

Create a vacuum using a vacuum pump or other pressure source to simulate the reference pressure (0 PSIA or 0 bara or 0 Torr) for absolute pressure calibration.
Vacuum is necessary, as absolute pressure transmitters measure pressure relative to atmospheric pressure.
Ensure that the applied pressure is stable, and monitor mA readings on the pressure indicator or calibrator.

Once the vacuum reference pressure has been applied, compare the transmitter output in milliamperes (4,000 mA) with the applied pressure (0 Torr).
Using the HART communicator or software with configuration modem, calibrate the lower range value (LRV).

Using the pressure generator, simulate the pressure corresponding to the upper value of the measuring range (URV) of pressure transmitter absolute.
Once the reference pressure has been applied, compare the transmitter output in milliamperes (20,000 mA) with the applied pressure (in our example 760 Torr).
Using the HART communicator or software with configuration modem, calibrate this value.

Now apply pressure in 25% increments.
Continue to monitor the mA readings on the digital indicator or pressure calibrator.
Record them for each pressure step applied from 0 to 100% of the calibrated range.
At each pressure step, allow sufficient time for the measurement to stabilize.
Check that accuracy conforms to the manufacturer's datasheet (+/- 0.1% for pressure transmitter absolute FKA).
Print out the calibration report and keep it for reference.

When adjustments are complete, release the pressure applied by the bleed valve and close it again.
Disconnect the pressure generator, power supply, HART communicator and any other equipment connected to the transmitter.
Refit the pressure transmitter to the process and open the isolation valve to resume operation.
From
1557,00 € Request a quote
From
7769,00 € Request a quote
From
202,00 € Request a quote
From
235,00 € Request a quote
From
545,00 € Request a quote
From
285,00 € Request a quoteRegular calibration ensures that the transmitter maintains its level of accuracy, avoiding any discrepancies in measurement and process control.
The frequency of calibration may depend on various factors, such as operating conditions and the recommendations of the pressure transmitter manufacturer.
Some industries may require more frequent calibration due to the nature of their processes and environment.
pressure transmitters can be calibrated in the field using portable calibration equipment.
However, for greater accuracy and optimum performance, sending the sensor to a calibration laboratory may offer additional advantages. Calibration takes place in a controlled atmosphere (temperature, humidity, atmospheric pressure).
An absolute pressure transmitter measures pressure in relation to vacuum (absolute zero), while a relative pressure transmitter measures pressure in relation to atmospheric pressure.

By calibrating your absolute pressure transmitters, you ensure that your measuring instruments remain accurate and reliable, contributing to the safe and efficient operation of your industrial processes.